Once our eBay and PayPal accounts are ready, our next move is to set up our eBay accounts’ business policies and connect with AutoDS. Let’s go over the steps.
1. Link PayPal to eBay

After creating and verifying our eBay and PayPal accounts, we need to link them together.
To do this, head over to the PayPal Account Information page in your eBay account.
On this page, you have the option to link your PayPal account to your eBay account by typing in the PayPal account name and logging in to verify.
Also, on this page, you can make sure that your PayPal account is verified. If it isn’t verified, you’ll have a link to verify your PayPal account. Ensure that your credit card is verified in the system as explained in the previous lesson.
2. Business Policies Setup

Before we connect eBay with AutoDS, we need to set up our eBay business policies.
Our business policies state our shipping, returns, and payment policies for our buyers. We need to create them before or while listing our first product.
First, we need to opt-in by navigating to the Business Policies Opt-In page. Once there, you’ll be able to begin creating your business policies.
2.1. Payment Policy Setup
We’ll begin with the payment policy. Click on ‘Create policy,’ followed by ‘Payment.’
In the ‘Policy name,’ type ‘Paypal default business policy’:

Next, in the ‘Payment options,’ select ‘PayPal,’ and type in your PayPal account email address.
Also, click on the ‘Require immediate payment when buyer uses Buy It Now’ checkbox. This option will ensure that our buyers will pay for our products in full before shipping them out to them.

That wraps up the payment policy. Scroll down and click the ‘Save’ button to return to your business policies page. Notice that you now have a Payment policy.
2.2. Return Policy Setup
Next, let’s create the return policy.
Same as before, in the business policies, click on ‘Create policy,’ then ‘Return.’

Give your policy a name – for example, ‘Default returns policy.’
Notice the repeating pattern when creating policies?

Now, we want to configure our return conditions. It’s important to make sure that the policies we choose comply with what our suppliers are giving us.
Since we are working with AliExpress, and we know that they offer us 30-day returns, that is exactly what we will offer our customers.
Begin by selecting ‘Domestic returns accepted.’ Then, choose the 30-day return period on the drop-down menu, and set the return shipping to be paid by the buyer.
Click in the ‘Replacement or exchange available’ checkbox, and do the same for the international returns:

Keep in mind that offering 30-day returns help us rank higher on eBay’s search results when comparing to 14-day returns or no returns.
2.3. Shipping Policy Setup
Last but not least is our shipping policy. This policy states how long it takes us to provide a shipping label and the delivery time.
Once again, in the business policies, click on ‘Create policy,’ then ‘Shipping.’

Keep in mind that the shipping policy that we are creating here applies to Chinese suppliers. When working with US suppliers, the shipping settings will be different.
2.3.1. U.S Shipping Policy (Domestic)
The first selection under U.S shipping should be ‘Flat: same cost to all buyers.’
Then, under ‘Services,’ we will select ‘Economy Shipping from outside the US (11 to 23 business days)’.
Since AutoDS calculates and adds the shipping cost inside the product cost, you can select ‘Free shipping’ on the right checkbox.
The shipping cost is added to your break-even settings, so you can offer free shipping without worrying about losing any money. Offering free shipping helps us rank higher on eBay’s search results. Therefore, it is essential to have it on.

Notice how there’s another shipping service in the image above? That is a neat little trick to rake in extra profits from time to time.
What we do is click on ‘Offer additional service,’ and then choose ‘ePacket Delivery from Hong Kong (7 to 12 business days)’ with a shipping price of $0.97.
The trick is that this is the shipping method that we will use anyway. But, as long as we offer a free shipping option, our listings will have better visibility on eBay.
In the Handling time (the time it takes us to provide a tracking number), select ‘4 business days.’
Some sellers can provide tracking numbers after 1-2 days, but we don’t want to risk setting a faster handling time. That’s because late shipments can negatively affect our seller accounts, and we don’t want that to happen.
Once you start getting sales from the same seller who constantly ships within 3 days or below, set your handling time to 3 days accordingly on a new policy and set it to the products from that seller.
The less handling time we have, the higher we rank on eBay’s search. But, it’s not worth the risk until we know for sure that it is possible.
2.3.2. International Shipping Policy
Since AliExpress suppliers can ship internationally, we’ll allow international orders on our store. This will help us generate more sales, as opening our store to the world brings many extra visitors.
From our experience, there are some countries where shipping is free and others where it costs a few bucks. Also, some countries cannot be shipped to at all. That’s why it’s crucial to know how to set your policies correctly.
To make everything clear, here’s how to set up international shipping from Chinese suppliers like AliExpress:
Right below the U.S shipping configuration, click on the ‘International shipping’ checkbox to activate international shipping and open up the settings.

Just like domestic shipping, we’ll begin by choosing ‘Flat: same cost to all buyers.’
Then, in the ‘Ship to,’ select ‘Choose a custom location.’
In ‘Services,’ choose ‘Economy Shipping from China, Hong Kong, or Taiwan to worldwide,’ and choose the following countries:
Canada, Europe, United Kingdom, Germany, France, Japan, and Australia. Set their shipping cost to $0 (free shipping).
Next, add another service, choose a custom location, and select ‘Standard Shipping from China, Hong Kong, or Taiwan to worldwide.’ Select the same countries as above, with an added shipping cost of $2.97 and $0.97 for each additional unit. This is the same trick we did above for a chance to earn extra profit.
Finally, for the countries that we can ship to but not for free. Add another service, choose a custom location, and select ‘Economic Shipping from China, Hong Kong, or Taiwan to worldwide.’
Now, choose the following countries: N. and S. America, Mexico, Brazil, Russian Federation. For these countries, set a shipping cost of $4.97 plus another $3.97 per unit.
This will cover our shipping costs, and in some cases, leave some extra change. Also, keep in mind that we are not paying extra on shipping prices for additional units. That’s a 100% profit margin that we enjoy on international orders.
2.3.3. Additional Ship-To Locations

Under the ‘Additional ship to locations – buyers contact for costs,’ select ‘Will ship worldwide.’
This will ensure that we won’t miss out on sales from buyers in countries that aren’t listed in our shipping policies. Instead, they will have an option to contact us for shipping rates. We will check with our seller and offer our buyer a shipping price accordingly.
2.4. Exclude Shipping Locations
Now that we’re done configuring which countries we ship to, it’s time to set which countries we cannot ship to.
To begin, scroll down and click ‘Exclude shipping locations.’

Under ‘Domestic,’ exclude all three countries by selecting them (Hawaii, US Protectorates, APO & FPO).
Under ‘International,’ under Asia, click ‘show all countries’, and exclude China and Hong Kong.
Finally, next to ‘Central America and Caribbean,’ click ‘show all countries’. Exclude Puerto Rico, and that’s it – you’re all set with your shipping policy!
Click on ‘Save’ below, and now all of your policies are up and ready to go.
3. AutoDS Setup

Now that our eBay business policies are ready and our PayPal accounts are linked and verified, we can proceed to connect eBay with AutoDS and begin business automation.
3.1 Create Your AutoDS Account
Begin creating your AutoDS account by clicking on the link, then ‘Sign Up’ on the top right-hand corner.

Next, start the registration process by entering your email address.

Next, fill in your full name and password. Then, click ‘Continue’.

Click ‘Continue’ to move on to the next step.
On the next screen, we need to choose the marketplace that we are going to dropship on.

Select ‘eBay marketplace.’
Now, we need to choose the right plan to begin our dropshipping journey. Keep in mind that the annual subscription entitles you to a 20% discount on all plans, so it’s definitely worth checking out.
Either way, you can dip your feet in the water with a seven-day trial for only $0.99. Start small, and grow big!

If you’re on a fresh start with no listings on your eBay store, begin with one of the ‘New Dropshipper’ plans and work your way up to bigger numbers and bigger profits.
If you already have listings on your store, choose a relevant plan based on your number of listings. Click on the ‘Try for $0.99’ in your preferred plan to continue.
Next, we have our payment settings:

Here, we can select whether we prefer to use PayPal or a Credit card as a payment method.
On the right, we can also choose if we want AutoDS to automate our orders (order fulfillment) and tracking information (highly recommended for anyone who hasn’t tried!).
Furthermore, if you’re an advanced dropshipper with Virtual Assistants, you can enable VA accounts here, too.
Once you’re done going through your add-ons, select your preferred payment method. If you chose a credit card, fill out the required details to begin your subscription.
Many dropshippers choose PayPal as their payment method since they are also getting paid through PayPal. Therefore, it’s easier to manage the cash flow when it’s under the same platform.

Click on ‘Agree & Continue’ to begin your plan, and that’s all there is to it.
Congratulations, and welcome to the AutoDS family!
Let’s continue by connecting our eBay store.

The next screen will prompt you to click on ‘Add Store’ on the left-hand side. This will connect our eBay store with AutoDS.

Enter your PayPal email address, choose your eBay marketplace region (United States), and proceed to ‘Connect your store.’
That link will take you to the eBay sign-in page, with the message ‘Sign in with your eBay account to link your account to AutoDS’:

Enter your sign-in credentials, and click on ‘Sign in.’
Next, we’ll grant the application access to finalize the linking process.

Click on ‘Agree,’ and boom! You are now officially connected.
3.2. Monitor Configuration
After we created our AutoDS account, we’ll need to set it up and prepare it for our dropshipping business.
If you are using another software and now migrating to AutoDS, we encourage you to check our guide on How to Import Your Untracked Listings to AutoDS.
But, if you just started your dropshipping journey and don’t have any listings on eBay, skip the link above.
The first thing that we need to do is to set up the monitoring settings – price, stock, auto-orders, profit settings, and more.
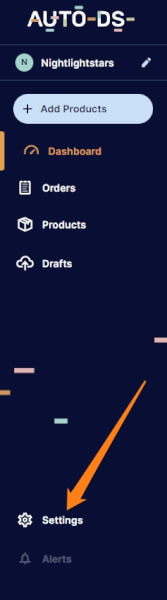
On the AutoDS bottom left menu, click on ‘Settings.’
As mentioned, AutoDS is an all-in-one dropshipping tool, which is why there are several store settings with every option to help you profit more and succeed. You are in full control of your dropshipping business.
Now let’s go through each setting and set it up correctly.
3.2.1 Store Settings – General

- Under ‘Store Settings’, make sure your store is selected. Click on the supplier that you want to configure. In this case, it’s ‘AliExpress CN.’
- On the right tab, click on ‘General.’
- Ensure that ‘Automatic SKU filling’ is deactivated. This way, it will make it harder for other eBay dropshippers to copy products from your store.
- Set the ‘Maximum Shipping Days’ to 40 days. Our shipping policy supports up to 40 days. Any shipping time beyond that will be set as ‘out of stock’ by the system.
3.2.2 Store Settings – Pricing
Now, let’s go over the pricing settings. Ensure that you are still on the AliExpress CN supplier on the left side, and click on the ‘Pricing’ column on top.

Here is where we will set our pricing and profit settings.
To begin, calculate your total fees % and type them in the ‘Fees’ field. This should be a combination of eBay fees and PayPal fees that we must pay when receiving our buyers’ payments.
The PayPal fees differ from country to country. Ebay fees differ depending on our store subscription plan and the category that we are selling in.
For example, if we have a basic eBay store subscription, our final value fees on most categories will be 9.15% of the product’s price (or 10% if there’s no store subscription).
Regarding PayPal fees, we’ll take an example from U.S residents, with a domestic selling fee of 3.4% plus $0.30 per transaction. International transactions are 4.4% plus $0.30. So, we’ll take the international rates, and enjoy the extra profit from domestic orders.
To sum up, our total fees are 9.15% (eBay final value fee) + 4.4% (PayPal fee) = 13.55%. Let’s add another 5% if we are charged with tax when purchasing from AliExpress to specific countries.
This brings us to a total of 18.55% fees, which is also known as our break-even. On the fees field, fill in your break-even percentage, and you’ll see an example of your total product cost, as can be seen in the image above.
In the ‘Additional Profit in %’ field, type in your desired profit % on each order. This way, even if the supplier changes their price, AutoDS will keep your profit margin the same by changing your prices accordingly. We’ll go with 10%.
The same goes for ‘Additional Profit in $’ – enter your desired profit additionally in fixed $. We will add $0.30 to cover PayPal’s extra fee of 30 cents per transaction.
We can also set a ‘Dynamic profit’ to set dynamic profit margins for different price ranges.

Like the example above, we create rules for dynamic profiting.
For instance, on any price range from $0 to $50, we want to gain 15% profit plus $0.30.
Price range between $50-$100 – we want 12% profit plus $3.
You can play around with these settings later when you have a range of products in your store and enjoy smarter profiting.
Last on our pricing settings is rounding out prices and including the shipping price:

Set Price Cents Value will round our prices to $.99, which simply looks better than random numbers and is a proven psychological method to attract more buyers.
Enable this option to have AutoDS round your prices. For example, $14.74 will round to $14.99, whereas $12.04 will round to $11.99, and so forth.
3.2.3 Store Settings – Lister
The final section that we want to configure in our store settings is the ‘Lister’ column on top.

Start by choosing your default product quantity. As long as the product is in stock, AutoDS will keep this quantity available. After selling a product, or once it returns to stock, the quantity will remain the same as configured here.
If this is your first store with a limited number of listings, choose 1 as the default product quantity.
As you grow, be sure to offer 2 or more quantities per listing, as many customers want to buy more than one quantity. You will benefit from higher average order values (AOV), which means more profit!
In the ‘Default Item Country’ field, since we are dropshipping from AliExpress (using their Chinese warehouses for this setting), we will use ‘China’ and write any item city that belongs to it.
Under ‘Shipping Methods,’ we have the option to choose between:
- Cheapest (go with the cheapest method, regardless of tracking)
- Cheapest with tracking
- Fastest with tracking
To maintain a high seller level and satisfied customers for the long-term, we’ll go with the ‘Fastest with tracking’ option.
Remember that AutoDS will combine the shipping price with the product price. On top of that, the system will add your break-even and profit settings.
Therefore, not choosing the cheapest option will keep your profit configuration, so you don’t have to worry about profiting less with different options.
That’s why we prefer to go with the option that will leave us with satisfied customers who will want to return to buy from our stores again.
After this stage, we are done configuring our store settings for the AliExpress CN supplier.
However, there’s another neat feature that will help you get more sales and maximize your profit. Meet our one-of-a-kind price automation feature!
Ready to see what it does? Next to the Store settings tab, click on ‘Automations.’ Then, click on ‘Add Automation.’

Give your automation setting a name, for example, ‘AliExpress Price Automation,’ and click ‘Next.’
We will set conditions – if a product is selling well, raise the price a little each time so we can profit more until we reach the sweet spot.
On the other hand, for products that are not selling, drop the price until we reach a certain limit or until it starts to generate sales. Genius, right?

Start with setting up the price increase condition – if the product sold more than an X amount in Y days, increase the price by (set a percentage %), up to (set a limit %).
If a product doesn’t sell for an X amount of time, drop the price by Y.
Configure your settings your own way, or like the image above, and click ‘Next.’
Now, we’ll set the opposite – how to increase the selling potential of products that are not selling:

In the image above, we set a condition where a product doesn’t sell at least once every 5 days, lower the price by 1%, to a maximum decrease limit of 5%.
You can configure your own settings or copy the screenshot’s settings above – just be sure to calculate your break-even and total profits when automating the price decrease.
Finally, click on ‘Next,’ and you’ll move on to the ‘Assign products’ section, where you’ll need to assign products to these rules that we created.
If you have products in your store, go ahead and apply the rules to them. If not, click on ‘I will assign products later,’ and come back to assign these rules to your listings once you have them in your store.
That’s all there is to it when configuring eBay policies, connecting, and configuring our AutoDS account. It may feel a little overwhelming initially, but all of the technical work is behind us.
We have set up our eBay account our business automation tool, and from here on out, the skies are the limit!