When running our own dropshipping business, generating interest translates into generating sales. With this in mind, getting the right message in front of our target audience at the perfect time is key. With optimized dropshipping Facebook Ads we are able to do exactly that.
In fact, Facebook ads help our business get more visibility and reach. Thus, we can expand our business even further. On top of that, by getting the right message in front of the right people, Facebook ads help us boost conversions and sales.
By using Facebook ads to establish a relationship with our target audience, we will not only increase sales but will also become recognizable. With the visibility we get from dropshipping Facebook ads we can increase our brand recognition and grow our dropshipping business.
With that said, in this article we will learn everything there is to know about Facebook Ads. From the setup to the final launch, we have you covered with this ultimate step-by-step guide.
How To Create Facebook Ads For Your Dropshipping Store
Creating dropshipping Facebook ads is not an extremely difficult task, but it can get confusing. Nonetheless, the process requires us to go over numerous steps to ensure a proper audience reach, target, and optimization.
With this in mind, we will go over the step-by-step process of the entire procedure. This covers how to create and launch a successful dropshipping Facebook ads campaign.
- Step 1: Set Up A Facebook Page
- Step 2: Create A Facebook Ads Account
- Step 3: Install The Facebook Pixel In Your Dropshipping Store
- Step 4: Conduct Audience Research
- Step 5: Create A Facebook Ad
- Step 6: Set Up Your Facebook Ads Campaign Goals & Ad Set
- Step 7: Launch Your Dropshipping Facebook Ad
- Step 8: Analyze Your Facebook Ads & Scale Your Success
Step 1: Set Up A Facebook Page
First and foremost, it’s important for us to know that by setting up a Facebook page we’re able to enjoy numerous benefits in growing our business. When we set up a Facebook page we’re able to build a community around our products and brand. Consequently, this helps us target people who are genuinely interested in our product.
Thus, by building a follower base, we’re able able to optimize our marketing efforts toward these followers. Furthermore, our posts will be able to bring value to our followers and direct them to our dropshipping store.
To start, from our Facebook account we need to create a business page. We can find this option when we click on ‘Pages’ in the left navigation bar. Then, it will take us to the ‘Pages’ site where we can click on the ‘Create New Page’ button. Once we’re there we can start filling out our page information like our page name, category, and description.
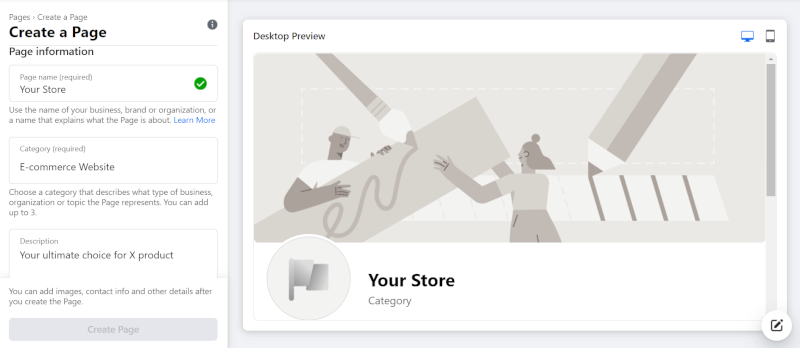
Notably, a pro-tip is to set our category to E-commerce Website since we will direct visitors from this page to our dropshipping store. Next, we’ll click on ‘Create Page’ and wait for a few seconds for Facebook to create our page.
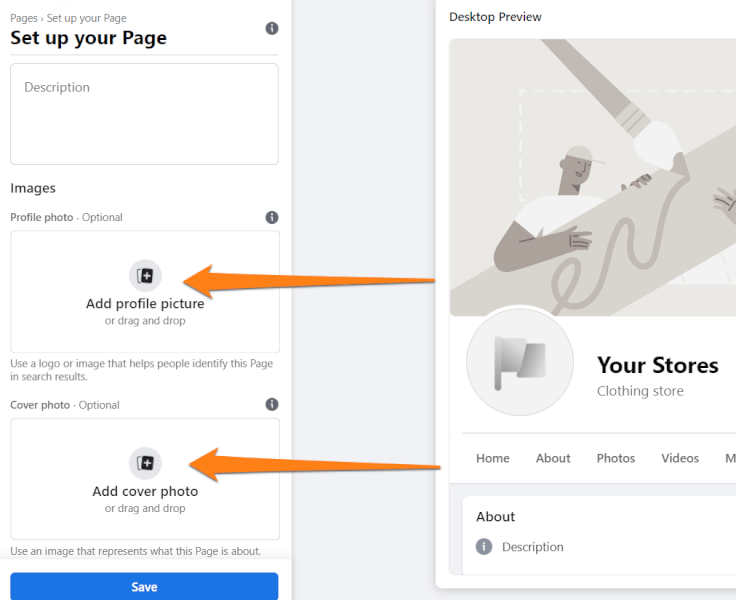
Once we’ve done that, we’re able to set our profile and cover photos that will portray our dropshipping store. Moreover, once our page is completely optimized we have a better chance of receiving organic traffic.
Step 2: Create A Facebook Ads Account
When creating a Facebook Ads account, things can get a little complicated. However, if we follow these steps we’ll have no problem setting up our account.
Now that we have set up our Facebook page, we can proceed to create a Business Manager Account. Then, we can create our Facebook Ads account in the Business Manager account. Let’s dive into the process and create our account.
How To Create A Facebook Business Manager Account
Interestingly, with the Business Manager account we can manage all of our ad campaigns as well as other business aspects. And, to begin we’ll go to the Facebook Business Manager Homepage.
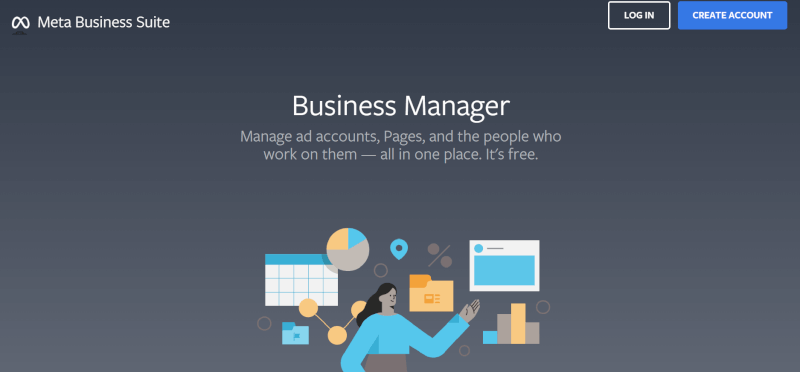
Next, we’ll click on the ‘Create Account’ button and fill in our business information. A pop-up window will appear where we can fill in our own name, our business name, and business email.
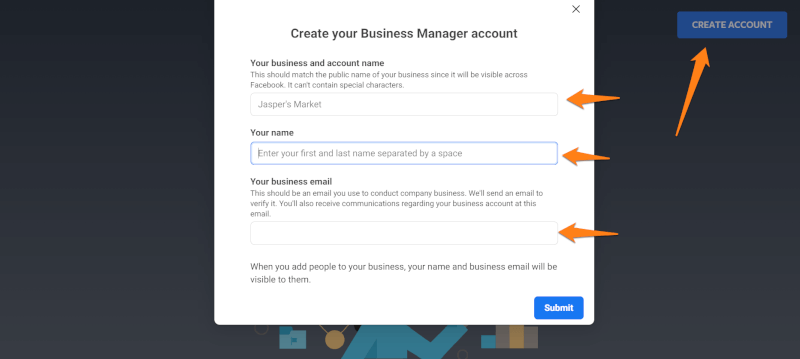
Once we’ve filled this information in and clicked ‘Submit’, Facebook takes us to the Facebook Business Suite page. Finally, once we’re there we can create our Facebook Ads account and start creating and managing our ad campaigns. Additionally, we can use this space to navigate through other business activities. Some additional business activities we can manage are billing, events, appointments, orders, etc.
How To Create A Facebook Ads Account
Finally, since we have our Business account, we can go ahead and create our Ads account now. First, we start off by going to the drop-down menu on the left-hand side and selecting our previously created Facebook page. We’ll make sure to choose the Facebook page of the dropshipping store we want to promote.
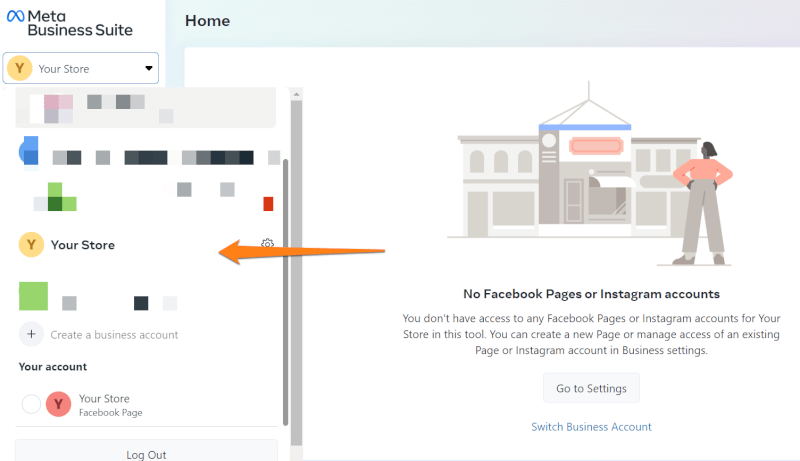
Now, we open that same drop-down menu to proceed with the following steps. After opening the menu, we can see the ‘Setting’ tool at the bottom. We click on that to see the options that appear.
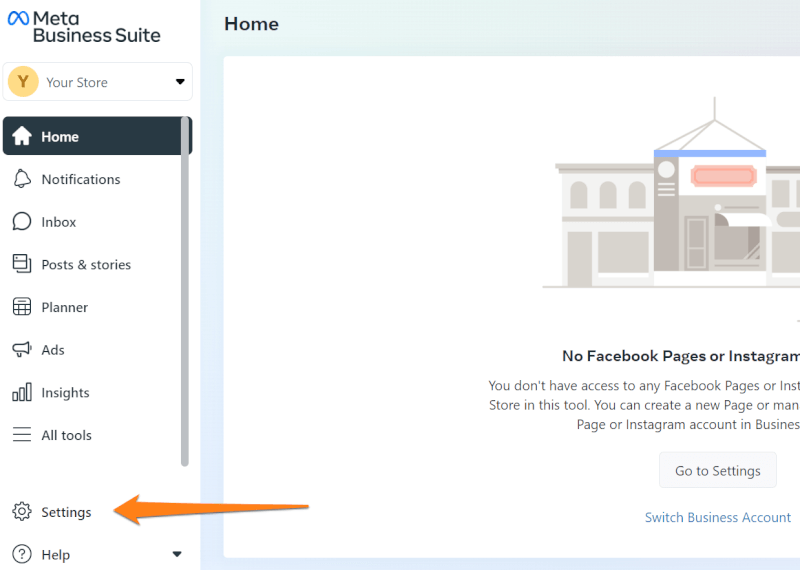
Once we’ve opened the Settings, next to the menu we’ll see an additional menu. Here we will find the ‘More Business Settings’ button and click on that. Then, this will take us to a new page.
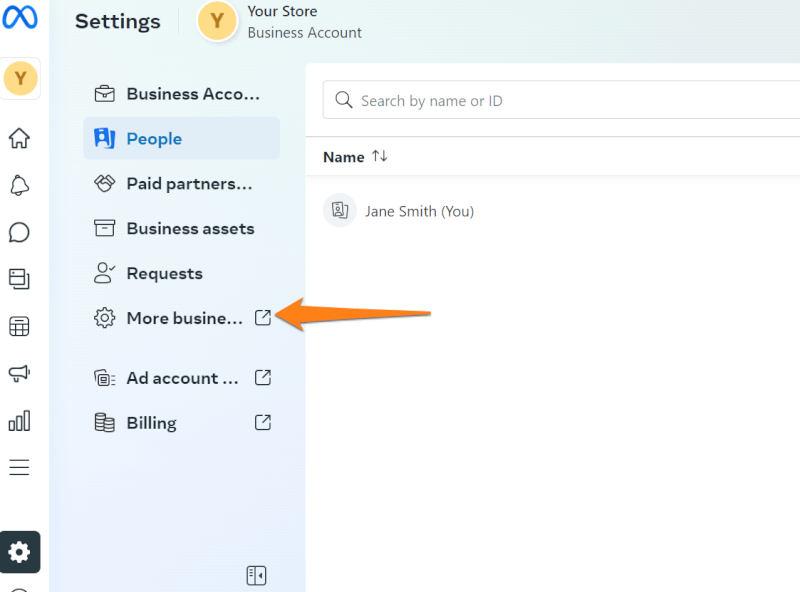
Finally, in the next set of steps, we can create our Ad accounts. On the right side, we can see the ‘Ad accounts’ button. Then we can click on the ‘Add’ button which will release a drop-down menu. Now, from this menu, we can choose the ‘Create a new ad account’ option.
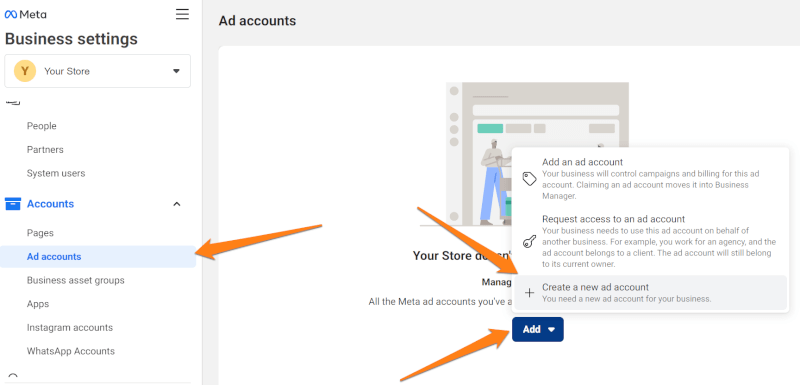
Next up, we fill in our ad account information. This section requires us to fill in the name of the ad account, time zone, and currency. However, make sure that you keep the currency to USD. We want to do this because it’s best for global audience targeting, plus the US is one of the largest markets. And finally, in the next window, we’ll select the correct business for the ad account and then click ‘Create’.
And, voila, we now have a Facebook Ads account for our dropshipping store where we can build marketing campaigns. Moreover, we can create ads that will be focused on our target market. Additionally, we can set goals and manage all our ads.
Step 3: Install The Facebook Pixel In Your Dropshipping Store
After we have set up our Facebook Ads account, the next crucial step is installing the Facebook Pixel. To clarify, a Facebook Pixel is a piece of code that we place on our website to help us track our store visitors’ activity. For example, if someone clicks on a blog post, or adds a product to their cart, Facebook Pixel tracks those events and keeps a record of them.
Furthermore, the data the Facebook Pixel collects helps us track conversions from Facebook ads and optimize them. Moreover, this data also helps us build target audiences that are most likely to make a purchase. It also helps us remarket to people that have already visited and been active in our store.
How To Install The Facebook Pixel
Since we have a Facebook Business Manager and Facebook Ads account, we can utilize this great tool. Let’s look at the step-by-step process for installing the Facebook Pixel in our dropshipping store.
To begin, we need to first sign in to our Facebook Business Manager account. Next, on the page, we can click on ‘All Tools’ and select the ‘Events Manager’ option.
![]()
Once the new tab opens with the Events Manager page we need to make sure to select the right ad account. We can select the correct ad account from the drop-down menu in the top right corner.
Afterward, we need to click on the green plus icon in the left column that says ‘Connect Data Source’.
![]()
Once we click on ‘Connect Data Source’ a pop-up will appear with four connection options. Out of those four options, the one we need to choose is ‘Web’. After that, we click on ‘Connect’.
![]()
The following pop-up that will appear asks us to name our Facebook Pixel. After we name it according to our store name, we need to click ‘Create’. The following step will ask for our website URL.
At this point, the next thing we need to do is choose a partner from the partner’s list. In this step, we will choose the most appropriate partner based on which platform we use for our store.
Notably, choosing a Facebook partner is easier and more efficient in the Pixel installation process. This is due to the fact that if we choose to not select a partner, then we will have to follow additional instructions and write some code ourselves.
![]()
Facebook Pixel Setup In Your Dropshipping Store
Excitingly, we’re well on our way to installing the Facebook Pixel. However, before we finish, we’ll first need to connect the Pixel to our dropshipping store.
In this example, we’ll take a look at how to install the Facebook Pixel on our Shopify store. To begin, we need to navigate to our store’s dashboard, then click on ‘Online Store’ and select ‘Preferences’.
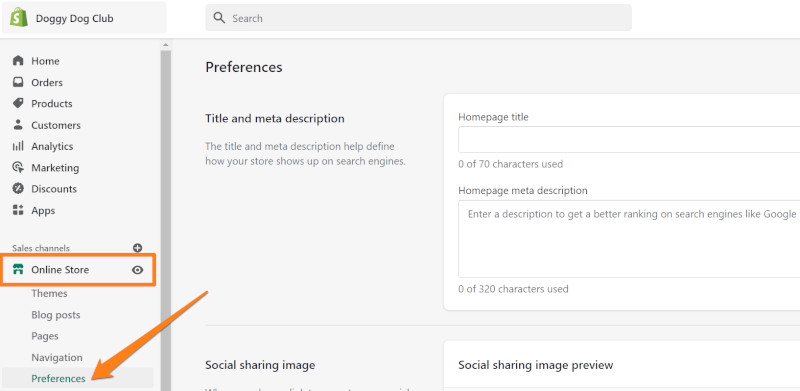
Afterward, we need to scroll and locate the ‘Facebook Pixel’ option. Next, we will click on ‘Set Up Facebook’.
![]()
To continue, scroll down to the bottom of the page and click on ‘Add sales channel’. Now, to confirm that we allow our dropshipping store to access our Facebook account, click on ‘Connect account’. For security reasons, we are asked to enter our Facebook password. After entering the password, click ‘Continue’.
When asked about access, click ‘Continue’ in order to allow our store to integrate with Facebook. Afterward, it asks for permission to connect our store to our Facebook account or page. Next, we need to integrate the pixel with our dropshipping store.
Integrate The Pixel With Your Dropshipping Store
![]()
Now, let’s use an example with the top-rated selling channel, Shopify. From here, under ‘Business Manager’, select the correct account that is connected to the page created for our store. Then, click ‘Connect’.
For the next step, we will connect our Ad account which should show up as an option. We also need to pay attention to connect to the right account.
In the following step, we’ll view and accept the Facebook terms. This step will take us to Facebook where we are able to review them and then click on the ‘Accept’ button. Afterward, we will find ourselves back on our store tab where we will click ‘Done’.
Following this, we can now go to our Facebook page and click ‘Connect’ again, ensuring to connect to the right page. Now, we are almost done fully integrating our Pixel, just a few more steps.
Importantly, we need to turn on customer data sharing, then choose the ‘MAXIMUM’ setting. We need to set this up so that our Pixel maximizes conversion rates and collects the most data it can.
Next, we need to select the right Pixel to use. We can do this by looking for it by name or finding the ID# and making sure it matches the one from the Pixel created on Facebook Business Manager.
Testing The Facebook Pixel
Before finalizing the setup, we need to test our Facebook Pixel to ensure everything is properly installed. To do so, on Facebook Business Manager we need to verify that there is a checkmark to ensure the Shopify setup is completed.
Now click on ‘Next’. In the following tab, type in your Shopify store web address and click ‘Send Test Traffic’.
As such, a new tab opens with our website. Then, click on a couple of products and come back to the Facebook tab. If the pixel works, a green dot will appear, confirming that all is in order.
Notably, if it says ‘Not Active Yet’, we need to fully test the Pixel with the ‘Test Events’ option. To test your Pixel thoroughly, click on the ‘Test Events’ tab, and enter your Shopify store web address. Then, click on ‘Open Website’.
Like in the previous step, perform a couple of actions on your Shopify store then, go back to the Facebook Pixel. Importantly, we must test our pixel to ensure we are getting the necessary data from our store. Consequently, this helps us make an informed decision that will enable scalability for our store.
Step 4: Conduct Audience Research

Surely, we know that audience research is crucial for the success of our Facebook ads. Audience research means looking for and finding the people that are most likely to be interested in our product. Consequently, this gives us the best marketing return on investment (ROI).
Therefore, when creating our dropshipping Facebook ads we should first include as many interested audiences as possible. What this will help us do is include all the potential customers in our targeting without missing any. Down the line, with the help of Facebook’s smart engine, we can pinpoint the audiences most likely to convert and focus our targeting on them.
To help us organize and narrow down our target audience, we need to create a copy of the Audience Research Spreadsheet.
The Four Key Questions for Audience Research
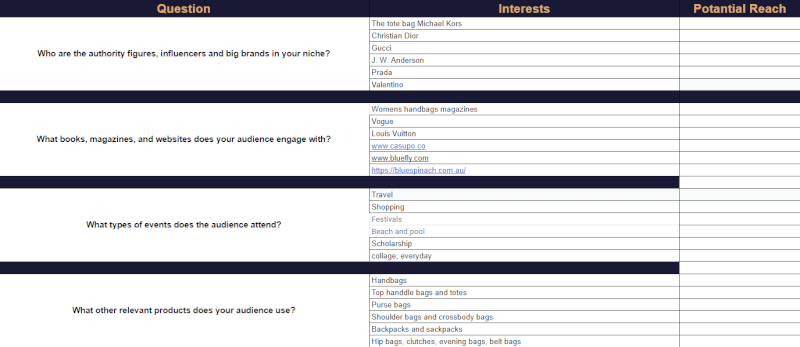
In particular, the Audience Research Spreadsheet is organized around the 4 key questions for successful audience research. These questions are how we will conduct our audience research. In fact, this set of questions is curated in order to know our target audience’s interests. With that in mind, their interests are based on three aspects. Accordingly, these three aspects include their event attendance, the content they engage with, and the relevant products they use. So, let’s take a look at the four key questions:
- Who are the authority figures, influencers, and big brands in your niche?
- What books, magazines, and websites does your audience engage with?
- What types of events does the audience attend?
- What other relevant products does your audience use?
Namely, the point of asking these questions is to tap into as many potential audiences as we can. Exploring numerous audiences will help us find unique groups that are likely to purchase our products.
Now, in the spreadsheet, in the leftmost column, we will find our questions. In the column next to each question, we should have 4-6 empty cells which we will fill up with the answers to the questions.
Interestingly, we can conduct this research by searching Google for the keywords. Guided by these questions, we can search for the necessary information we need to get to know our audience.
Implementing Audience Research

Finally, we can use all the necessary information we found from our audience research to build our Facebook ad campaign. Once we have the data, we will input the answers to the questions into our ad campaign. In effect, this will ensure that Facebook looks for audiences interested in the events, products, and content from our research.
On top of that, the research we did will help us tailor the ads themselves to our target audience in order to pique interest. With that being said, audience research not only helps us with targeting but also helps us attract our target audience, generate interest and bring about higher sales.
Step 5: Create A Facebook Ad
Now, after doing solid audience research for our dropshipping Facebook ads, we need to create the ads. Facebook ads are normally done with video or photos. With that being said, we need to work on creating really great visuals for our ads in order to immediately attract customers’ attention.
In fact, video Facebook ads are the most effective way to market our dropshipping store. Utilizing video ads will stimulate more engagement and thus produce better results.
As a matter of fact, in order to create and launch a successful video ad campaign, we need to learn how to create converting video ads. Above all, audiences enjoy watching an appealing video featuring the product they’re interested in buying. Although image or gif ads are not a bad choice, video ads are simply more effective and will convert better. In that case, let’s see how to find a good product video.
Find A Product Video

With this in mind, we first need to find a product video for the item we are advertising. The product video will serve as a template that we will edit. Notably, there are a few ways of getting the product video we need for our Facebook ad.
Sometimes, sellers may have their own product video that we can utilize as a template. However, often the videos do not look professional. What’s more, depending on where the supplier is from, they might have captions in a different language embedded in the video.
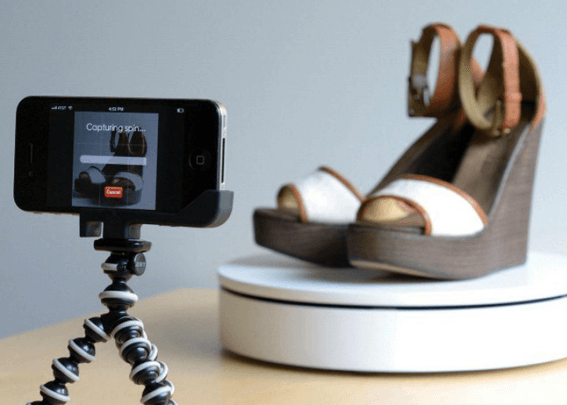
Otherwise, we may get lucky and find a product video with good visuals on a supplier’s product page. This trend of adding videos to product pages is picking up but it’s not common enough for us to rely on. Unfortunately, suppliers do not always include such videos on their product pages.
However, if we are not able to find a product video from our supplier, we can try a few things. One thing we can try is to reach out to our supplier and ask for a product video. Another way is to order the product and film the video ourselves. And, lastly, we can try to find a product video from another supplier or competitor.
Edit The Product Video

Once we manage to get our hands on a product video, we’ll need to edit it. With that said, there are a couple of reasons why we need to do this, one of which is the length of the video.
Our video ad shouldn’t be longer than 30 seconds since the attention span of our viewers decreases over time. Because of this, brevity is our friend and our video should be short and to the point.
The other reason why we need to edit our video is that it cannot be the same as our supplier’s. Our dropshipping Facebook ads are meant to help us stand out from the competition and copying the product video defeats that purpose.
Moreover, when it comes to editing the video, there are numerous platforms we can use. A great video editing service is Animoto since their platform is specially made for dropshipping and eCommerce.
However, if we are able to, we can also choose to edit the video on our own from scratch. Either way, we need to work on getting eye-catching visuals and we can even add sound effects or background music to elevate our ad.
Undeniably, one of the most important factors in creating a great Facebook ad is nailing the first 3-5 seconds. These few seconds are what determine whether a potential customer converts. As people are constantly getting bombarded with ads, we need to catch their attention from the get-go.
The Importance Of Variations And Split Testing
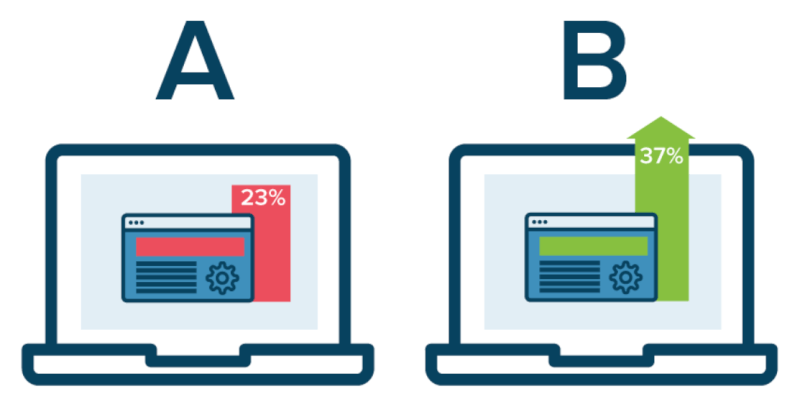
Now, in order to optimize and ensure the success of our dropshipping Facebook ad, we should create multiple video ad variations and test them. A good tactic to use is to create three variations of our ad and run all three at the same time. In fact, the biggest difference between our three ads will be the first 3-5 seconds.
What this shows is the importance of those few starting seconds and how big of an impact they can have in converting viewers into customers. Moreover, by split testing our Facebook ad variations we can see which version converts most and scale it to larger audiences. Additionally, from the split testing, we can learn what works best and why and use that in future Facebook ad campaigns.
Step 6: Set Up Your Facebook Ads Campaign Goals & Ad Set
If you’re an avid reader of AutoDS’ blogs then you know that we stress how important planning and preparation are. As a matter of fact, one of the more technical aspects of this process is configuring the ad sets and campaign settings in the Facebook Business Manager.
These settings ensure that our dropshipping Facebook ad has the maximum effect at the lowest possible cost. Moreover, they tell Facebook how we want the viewers to interact with our ad and which audiences to reach.
How To Create A Campaign For Our Ad Sets
Let’s dive into the first step and create a campaign for our ad sets. After we log in to the Facebook Business Manager account, we need to open the ‘All Tools’ option from the navigation bar on the left and select ‘Ads Manager.’
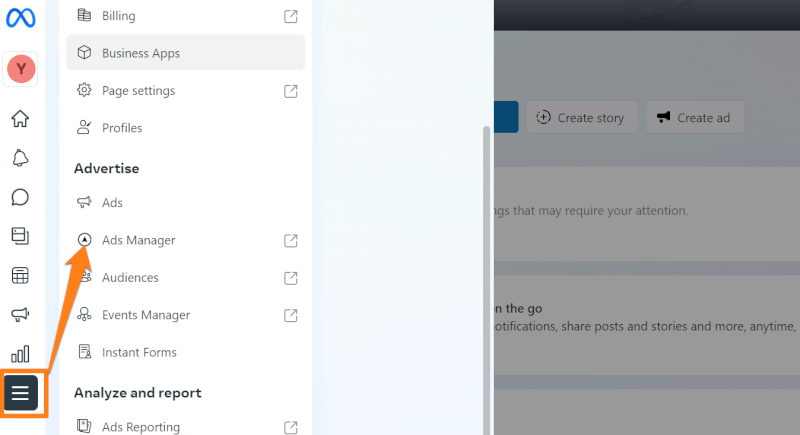
Next, we’ll begin the configuration process by clicking the ‘Create’ button on the top left of the page. The button can be found under the heading ‘Campaigns’.

Now, before we move on to the next step, we need to think about what our campaign goals are, meaning what we want people to do when they see our ad. Once we click ‘Create’, an additional menu appears with campaign objectives to choose from.
For example, one of the campaign objectives is ‘Traffic’ which will get our Facebook ad in front of people that are likely to click on our website link. However, one of the most expensive objectives we can choose is ‘Conversions’. With this objective, Facebook finds and targets people who often respond to Call To Action buttons and potentially convert.
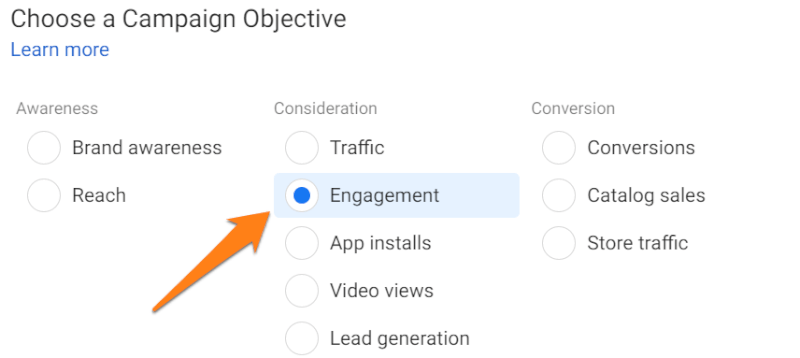
Typically, one of the best choices as an ad objective is ‘Engagement’. To clarify, this means targeting people that like to share, like, or comment on ads. Choosing this option at the beginning will help us figure out how profitable and interesting our product is. Furthermore, ‘Engagement’ is a more affordable choice that will save us from overspending on a product we are not sure will attract sales.
Usually, Engagement ads run at $5 – $10 per day which allows us to see how our product performs before we invest more in Conversion ads. Once we see our Facebook ad is getting traction, we can then invest in an ad campaign with a ‘Conversion’ focus.
Create & Configure Your Campaign
After choosing our campaign objective, we need to click on the ‘Continue’ button and name our campaign, ad set, and ad. Next, we need to configure our campaign.
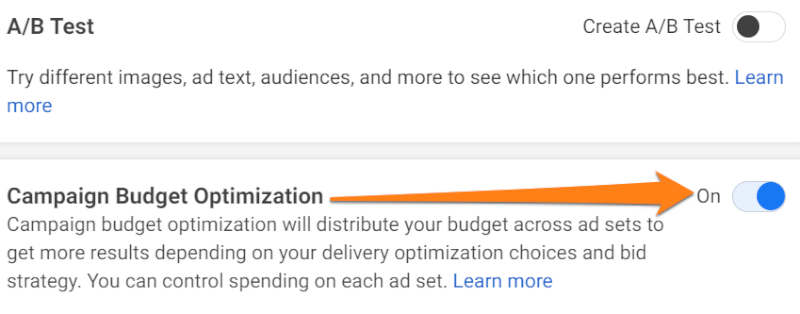
Most of the campaign settings don’t concern us, except for Campaign Budget Optimization. What this does is balance the budget between our different ad campaigns.
Notably, it’s a good idea to run three ads for each product because it allows us to test different ads and find the best-performing one. Fortunately, if we use this tactic, we can utilize the Budget Optimization tool to make sure we have a balanced distribution of our spending.
To enable the Budget Optimization tool, we will scroll down the page and move the dot to the ‘On’ position next to the ‘Campaign Budget Optimization’ section. What this tool will do is allocate more funds for the better-performing campaigns and less for the unsuccessful ones.
Setting Campaign Budgets
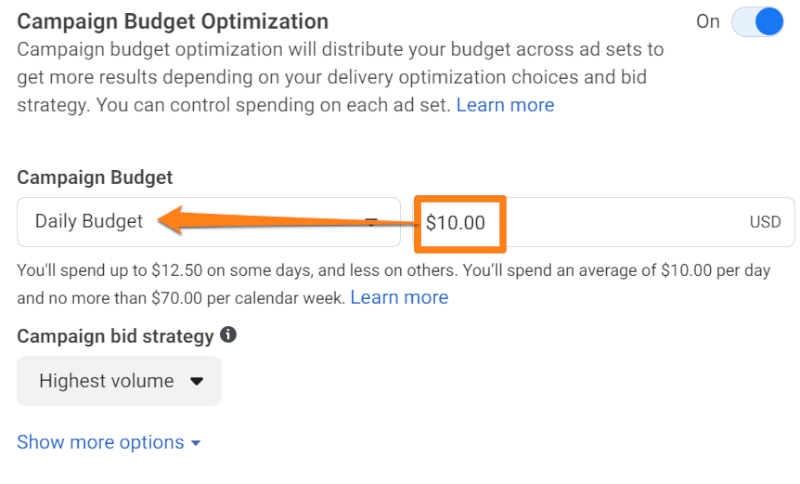
Once we turn on the Budget Optimization, we are immediately prompted to set a campaign budget. At this point, our objective is to spend the least amount of money to test the ad variations.
With that in mind, to configure the budget setting we should choose the option of a ‘Daily Budget’ rather than a ‘Lifetime’ budget. Our daily budget should be between $5 – $10 while we run the ads for 2-3 days. This is enough time to test our different ads on different audiences and see the results.
Since we are running a campaign focused on post-engagement, the information we will receive by running the ads for 3 days at $10 is invaluable. With that being said, the information we gather over this time period will set the stage for future marketing efforts.
Facebook Ad Sets

After setting up our campaign, we can move on to configuring the setting for our ad set. First, we need to set a schedule. Next, we need to choose the start date and time and leave the end date unchecked. Although we might be running this ‘Engagement’ campaign for only a few days, it still has the potential to perform really well, which can help us scale our success.
Audience Settings
Once we have configured the setting above, next we will customize our audience setting. In fact, this will help us reach the optimal audience for our product.
Location
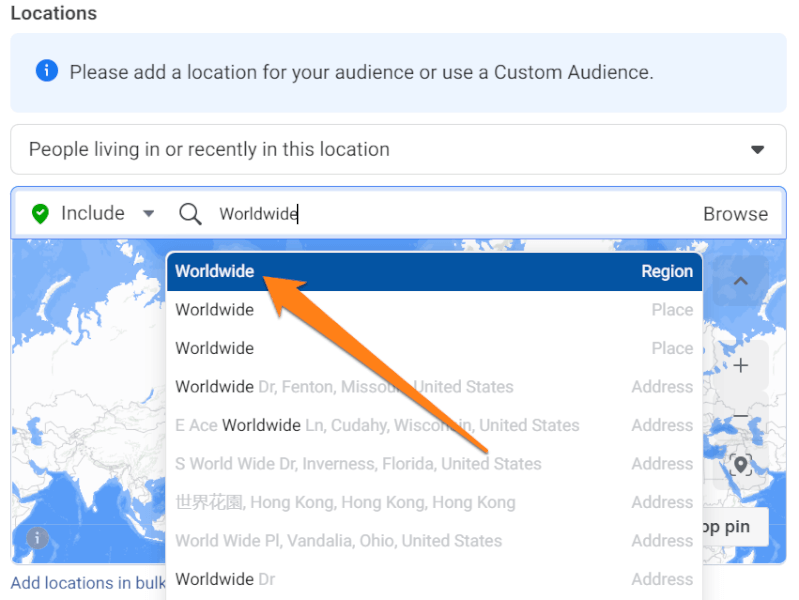
Let’s get the ball rolling with the first audience settings adjustment, the location. As such, we begin by removing all default settings under ‘Location’ and setting it to worldwide.
Specifically, one of the reasons we are choosing this setting is because we are running a post-engagement ad and we want to see which audiences might show interest in our product. Additionally, with worldwide targeting, Facebook finds interested audiences faster. And, since we’re paying per day, this will help us spend less on this campaign.
Age & Gender
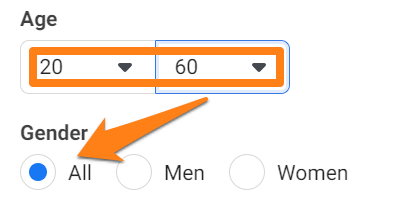
Our next step is to set an age range for our audience. For this setting, we want to go wide but not too wide so as to not prolong the process of finding our target audience. In this section, we need to make an educated guess as to what age group our most interested customers might fall in.
What’s more, we need to also select the gender target. Depending on what we are selling, we can set a more specific gender target. Some products might be more appealing to one gender over the other. However, in all other cases, we can just stick with the ‘all’ setting in the gender section.
Detailed Targeting
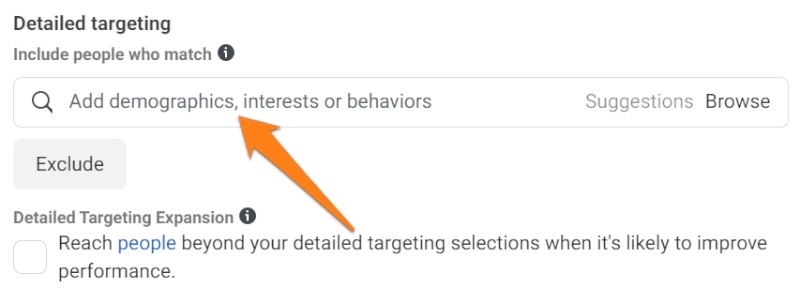
At this point, we need to edit our detailed targeting settings. In this section, we will input the behaviors, interests, and characteristics of our target audience. For this targeting, we can utilize the audience research we did before in Step 4.
So, in this section, we can write any trait in the search bar and add it to our targeting. However, what this might do is broaden our targeting too much. Since this is a post-engagement ad, our sweet spot for potential reach should be around 10 million. To clarify, we want this reach cap in order to avoid waiting for days for Facebook to reach our target audience. Therefore, we want to avoid this as we are paying per day for the ad.
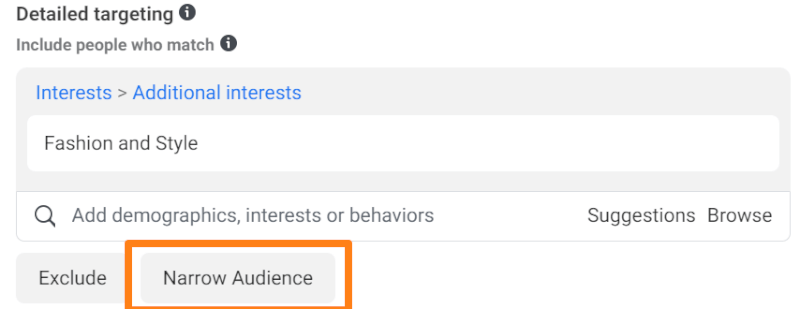
Now, if the potential reach gets too high when we input our detailed targeting preferences, we can use the ‘Narrow Audience’ option. What this section does is allows for further filtering by adding additional limits to the targeting.
In fact, what it does is tell Facebook that our audience must be, for example, interested in fashion but it must also be eco-friendly. In this case, the audience will narrow down quite a bit.
Language

Next we will set up the language of the ad. This helps Facebook target people who can read and understand our ad in whichever language we may set it.
Afterward, we will scroll down and click the ‘Edit’ button in the ‘Language’ section. For example, if we want to target English speakers we can choose the ‘English all’ option to include both UK and US varieties. Notably, we can also choose multiple languages to target.
Choose Ad Location
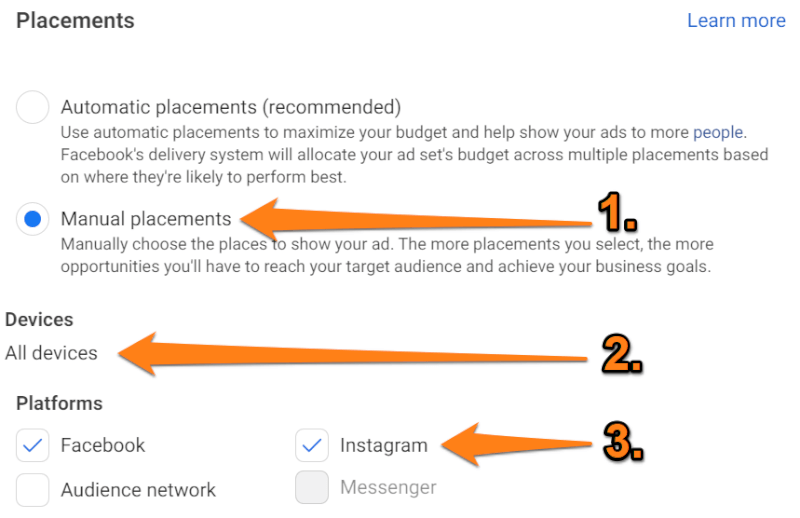
Finally, the hard part is done and now we just need to choose the location in which our ad will appear. Since we don’t want Facebook looking for audiences in the wrong places, first in this section we will choose the ‘Manual’ option. As a result, this will allow us to customize the ad placement.
Then, for ‘Devices’ we need to leave it on ‘All Devices’ allowing the ad to appear on both mobile and desktop. And, for ‘Platforms’ we will uncheck all except for ‘Facebook’ and ‘Instagram’.
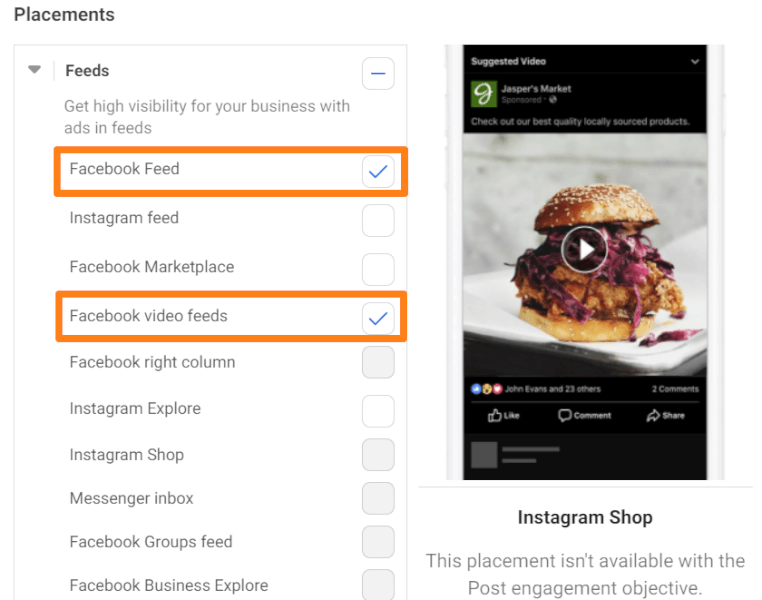
Next, we have the option to choose where on Facebook we want our ad to appear. For best results, uncheck everything except for ‘Facebook News Feed’ and ‘Facebook Video feed’. In fact, we are leaving the ‘Facebook Video Feed’ checked because people like scrolling through videos which increases the chances of our ad reaching them.
At long last, the ad set configuration process is now complete. And, we’re now ready to launch our dropshipping Facebook ad.
Step 7: Launch Your Dropshipping Facebook Ad

The hard part is over! Now we can launch our dropshipping Facebook ads. When launching an Ad Campaign, there are three sections we need to configure: the Campaign, Ad Set, and Ad.
Remember, though, that we’re configuring settings for the particular campaign goal of Post Engagement. As such, we’re spending $5-$10 a day, a relatively low budget, and targeting a worldwide audience to gauge interest in our product. However, for a conversion campaign, we need to go back and edit our ad settings.

So, without further ado, we’ll begin by logging into Facebook Ads Manager, clicking on ‘All Tools’, and going to the ‘Ads Manager’. Here we can see existing campaigns and ad sets. What we will do next is click on the ‘Edit’ button to open the campaign we have been working on and locate the Ad Tab. In the Ad Tab, we can begin our configuration process.
Choose An Ad Name

The first section asks us to name our dropshipping Facebook ad. Our name should be consistent with the name we chose for our campaign and ad sets.
Select A Facebook Page For Your Dropshipping Facebook Ad
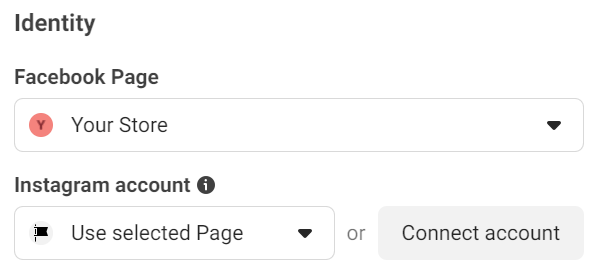
Following the ad name, there is an ‘Identity’ section where we can choose which Facebook Page to use for the ad. Every Facebook ad is essentially a post that we instruct Facebook to promote. Therefore, the ad must have a specific location; otherwise, the ad cannot launch.
Choose Post Type
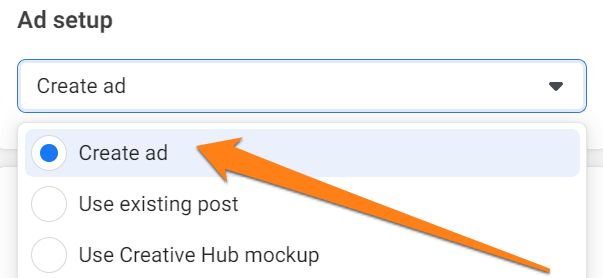
Some of us already have a post where we want to place the ad. Such is the case if we’ve already launched an ad and want to change the goal.
However, since we’re demonstrating how to create a first Engagement ad, we’ll create a new post. On the same page, scroll down until you get to ‘Ad Setup’, and select ‘Create Ad.’
Design Your Dropshipping Facebook Ad
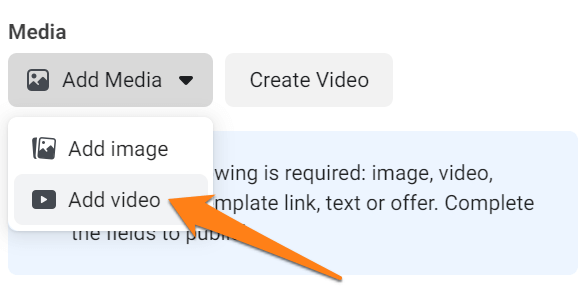
Finally, we’ve made it to the most interesting and relevant part of the process where we decide how the ad looks and what it consists of. Keep scrolling down to the ‘Ad Creative’ section and start with ‘Media’. Next, click on ‘Add Media’, then ‘Add Video’. This opens a new window where we choose and upload a product video.
Notably, our video shouldn’t be longer than 30 seconds, but rather it should linger in the sweet spot between 15 and 30 seconds. To continue, on the popup, click ‘Upload’, select a video, and click ‘Open’. Once it finishes uploading, we can see it in the Ad Creative section.
Launch Your Ad

Before we publish the dropshipping Facebook Ad, review all of the settings one last time. Check the campaign goal, your ad sets configuration, and of course, the ad itself. Does everything look good? Great! Now click ‘Publish’ on the bottom right.
How To Launch Multiple Video Ad Copies

As mentioned before, launching three video ad copies is an extremely effective way to test our product. Generally, this is the case because by launching variations of an ad copy, we can find the best version of it. Consequently, by doing that, we can see what was performing well and why.
However, testing variations of a video ad requires creating a separate campaign for each. If you have three video copies, simply duplicate the campaign and change the video. Then we will be able to find our winning video ad campaign.
Step 8: Analyze Your Facebook Ads & Scale Your Success

Last but not least, after successfully launching our ads, we only have one thing left to do. Now, after building and launching our ads, we need to monitor and optimize them. Analyzing our dropshipping Facebook ads is crucial for maximizing their success.
Fortunately, Facebook gives us data analytics that we can use to analyze, adjust, and optimize our ads accordingly. Now, it’s all about how to use this information correctly and improve and scale our ads for greater outcomes.
How To Analyze Facebook Ads
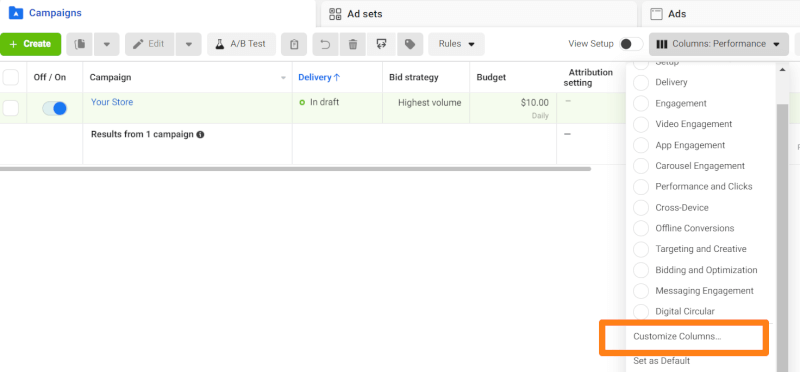
In order to start the analysis process, we need to customize our results column. At this stage, a day or two after the ad goes live, the campaign results should appear on the Ads Manager homepage.
First, we need to click on any of the three primary tabs (‘Campaign,’ ‘Ads sets’ or ‘Ads’), and slide over to the right where the different results data columns should appear. Next, we will customize the columns by clicking on ‘Columns: Performance’ and selecting ‘Customize Columns’ from the dropdown menu. At this stage, we need to select the metrics we want to analyze.
Analyze Ad Results
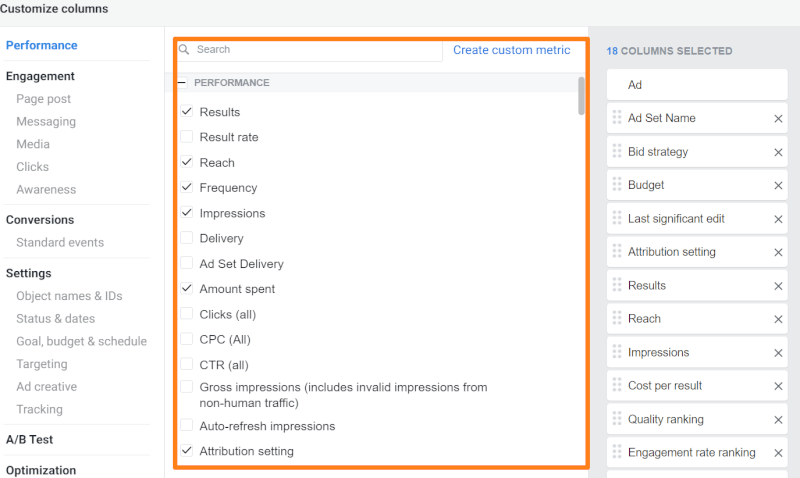
Now that we have the columns organized, it’s time to analyze the ad results. We will focus our analysis on these metrics:
- Overall results
- Counting ad appearances: impressions vs. reach
- Link clicks
- Video stats
- Frequency (repeat viewers)
- The cost of ad appearances
- Post reactions
- Content views
- Adds to cart, checkouts initiated, and purchases
In order to avoid confusion, let’s define some of these metrics. Reach is the total number of unique people that see our content. On the other hand, impressions are the number of times our content is viewed, no matter if it’s from a unique viewer or not.
Now, after analyzing our metrics we can make informed decisions and take the necessary steps to optimize our ads. By using these metrics to optimize our ads we are able to improve and scale our ads to reach bigger markets and get better results in the future.
However, sometimes the ads continue to perform poorly. One reason why our ad might be performing badly is the most obvious one, the product isn’t in-demand. This gives us good insight into what type of products we might not want to continue listing in our dropshipping store.
Furthermore, another reason why our Facebook ads might not be performing well is due to our targeting or demographics. This is something we can actually fix by conducting research and adjusting our targeting settings. Or, the ad might not be doing well because we didn’t run split testing and haven’t found the optimal version of our ad yet.
Scale Your Success

Even though we might have a dropshipping Facebook ad that’s performing well, we still need to take the right steps to ensure it stays that way. With that intention, we will implement an ad hierarchy.
Getting right to it, keep in mind the number twenty. The number 20 is our signal that we need to upgrade our campaign goal.
Once we get twenty content (website) views in an engagement campaign, we can move to a View Content campaign. Here Facebook finds audiences that tend to view the content of the product on a website.
Naturally, the increased content views result in more “Add to carts.” So, after we get twenty Add To Carts, it is time to upgrade to an ‘Add To Cart’ campaign objective. Consequently, in this new campaign, Facebook finds audiences likely to add our product to their carts.
As a matter of fact, some of them will make a purchase. But before we move on to the coveted Purchase campaign, we want to wait until we reach a minimum of 20 purchases.
Namely, we employ this tactic and invest this time in order to train the Facebook pixel gradually to zero in on the best audience for purchase conversions. Accordingly, from here, we are going to see an obvious rise in sales and profit.
Key Tips: What To Include In A Facebook Dropshipping Ad

To sum up everything, there are key elements that need to be taken into consideration in order to maximize interest and generate sales. With that being said, here are some key factors that should be considered when creating a Facebook ad:
- Target audience
- Highly optimized visuals
- Call to action (CTA)
- Price (both product price & budget for ad)
Now, let’s dive into each of these and see how they benefit our dropshipping Facebook ad campaign.
Target Audience

Now we know that having the right target audience helps us get the right information in front of the right people. Getting the Facebook ads in front of our target audience will surely boost conversions and sales because those are the people that are most likely to buy.
Moreover, with the right target audience, we will also save money because we are reaching the right people. This helps us avoid wasting money reaching enormous amounts of people who might not be interested in our product at all. In fact, reaching our target audience is our holy grail in growing our business.
Highly Optimized Visuals

Additionally, we need to have highly optimized visuals in order to catch the attention of our potential customers and pique their interest. As we are often visual creatures, optimizing the visual component of our dropshipping Facebook ad will ensure our message is seen.
Furthermore, with highly optimized visuals it’s not only about being seen but capturing the attention of our key target audience. Optimizing our visuals to include eye-catching and relevant information will help us boost conversions and interest.
Call To Action
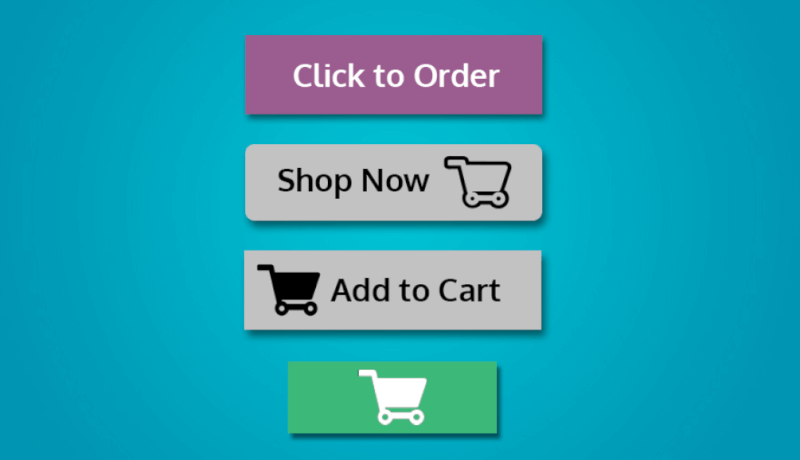
Interestingly, one of the most relevant aspects of our Facebook ads is our call to action (CTA). The CTA is what we are asking our audience to do. For example, we can ask them to buy our product, visit our website, read our blog, sign up for our newsletter, etc.
The CTA is crucial because it is the element that leads to our conversion. A clear CTA acts as a signpost telling our customers what to do next. Without a clear CTA, our customers may struggle to see the route to buying our product.
Price

And last but not least, we need to consider pricing. Specifically, we need to take into account the cost of our product and our budget for our dropshipping Facebook ads campaign. In order to get a good return on investment (ROI) in our marketing efforts, we need to optimize both our campaign budget and product price.
In fact, remaining competitive while also getting a decent ROI is the winning combination. However, Facebook ad campaigns can get costly, and we must continuously test to find our sweet spot. With that said, after following this step-by-step process, we’re ready to run our dropshipping Facebook ads.
Frequently Asked Questions
Do Facebook Ads Work For Dropshipping?
Yes! Facebook ads are a great way for dropshippers to market their business and reach out to potential customers.
How Do I Create A Facebook Dropshipping Ad?
First, you need to create a Facebook page for your store. Then you need to create a Facebook Business Manager account, after which you need to create your Facebook Ads account. Afterward, you can start creating your dropshipping Facebook ad in your Facebook Ads account.
Can I Dropship Without Facebook Ads?
Yes, dropshipping without Facebook Ads is possible. You can utilize other tactics to drive sales; however, with Facebook ads, you will be reaching your target audience that is most likely to buy. This will ensure you increase your sales.
How Much Does It Cost To Run Facebook Ads?
Typically you can expect your ads to cost you between $0.50 and $2.00 per click. However, this will vary depending on the type of campaign that we choose to run.
Conclusion
In conclusion, one of the most important things to remember is that dropshipping Facebook ads are not an expense but rather an investment. With optimal targeting, analysis, and optimization, our investment in Facebook ads will yield a return by boosting sales and visibility.
With the proper guidance in building our ad campaigns, we can increase our reach and grow our business. Undoubtedly, Facebook ads are a worthwhile advertising investment that we should leverage.
To learn more about marketing your dropshipping business, check out these articles:


 post content
 post content
